27 January 2014

How to Treat Acne With Potatoes in 5 Days

Raw potatoes are one of the best ways to treat acne. Just like bananas.

So if you have latex intolerance or any allergy associated with bananas, this recipe is for you.

I loved experimenting with potatoes to see how fast the actual pimple will heal and when the scar will disappear and I took photos along the way.

Here is the result of the experiment:

You can treat acne and pimples with raw potatoes in 5 days.

And on the sixth day there won't be a single scar.

Read the full recipe here.

For best results, apply the treatment 3 times a day.

How to heal acne with potatoes in 5 days


Potatoes are packed with potassium, chlorine and sulphur, which are known to dry oily skin, and are very efficient at cleaning acne blemishes.

The vitamins and minerals in potatoes help improve your skin, and the acids will clear up your pores. The magnesium will help reduce inflammation and swelling.

This post is shared here: Motivation Monday

24 January 2014

How to Slice a Banana in 3 Equal Parts Without a Knife

This is a tough one. I sometimes need to cut a banana in 3 equal parts but am never sure if they are equal, so I got super excited when I saw this clever way of slicing  in a movie by Bernardo Bertolucci I saw recently, called The Dreamers.

Here is a quick photo tip on how to slice a banana in 3 equal parts without a knife. Quite useful, don't you think?

And in case you're wondering what to do with the peels, here's an idea, why don't you use them to get rid of your acne?

How to slice a banana in 3 equal parts without a knife


22 January 2014

Baking Soda Destroyed My Hair

I cannot believe I'm writing this but I think that baking soda destroyed my hair.

It all started around 3 years ago when I learned about the devastating toxic ingredients in commercial shampoos and conditioners. To say that I felt betrayed by the industry would be an understatement. I was disgusted by the reported effects of chemical additives such as Sodium Lauryl Sulphate, Sodium Laureth Sulphate, Fragrance, Cocamide... all of which are inevitably present in every commercial shampoo, even those advertised as natural.

How baking soda destroyed my hair and why you should never use it

The baking soda solution

I started using baking soda as a no-poo shampoo and apple cider vinegar as a conditioning rinse. I have been washing my hair with that combo for almost three years. I felt my hair clean and I thought it was healthy until a few days ago when I saw it on this photo.


The baking soda disaster

Wait, this wasn't my healthy hair. It looked brittle and weak.

Lately I have noticed that I shed too many hairs but I somehow ignored that.

I thought that the split ends came as a result of the summer, the seaside and the sun and so I had a refreshing haircut a month ago but then, when I looked at my ends the other day, they were split again.

My hairs are so easy to break, I cannot believe my eyes.

I realized that I have dandruff but every time my husband noticed it I explained that it had just appeared because I hadn't washed my hair for too long...
Have I been looking at my hair through pink glasses for so long while vigorously advocating for no-pooing with baking soda?

The pH and why it is important for your hair

I started collecting information about using baking soda as a shampoo alternative from a chemical point of view. The more I researched the more often I read about how important the pH of the washing product is.

pH (potential of Hydrogen) is a measure of the acidity or alkalinity of a substance. pH is judged on a scale between 0 and 14. Anything with a pH less than 7 is acidic, 7 is neutral, and anything with a pH greater than 7 is alkaline.

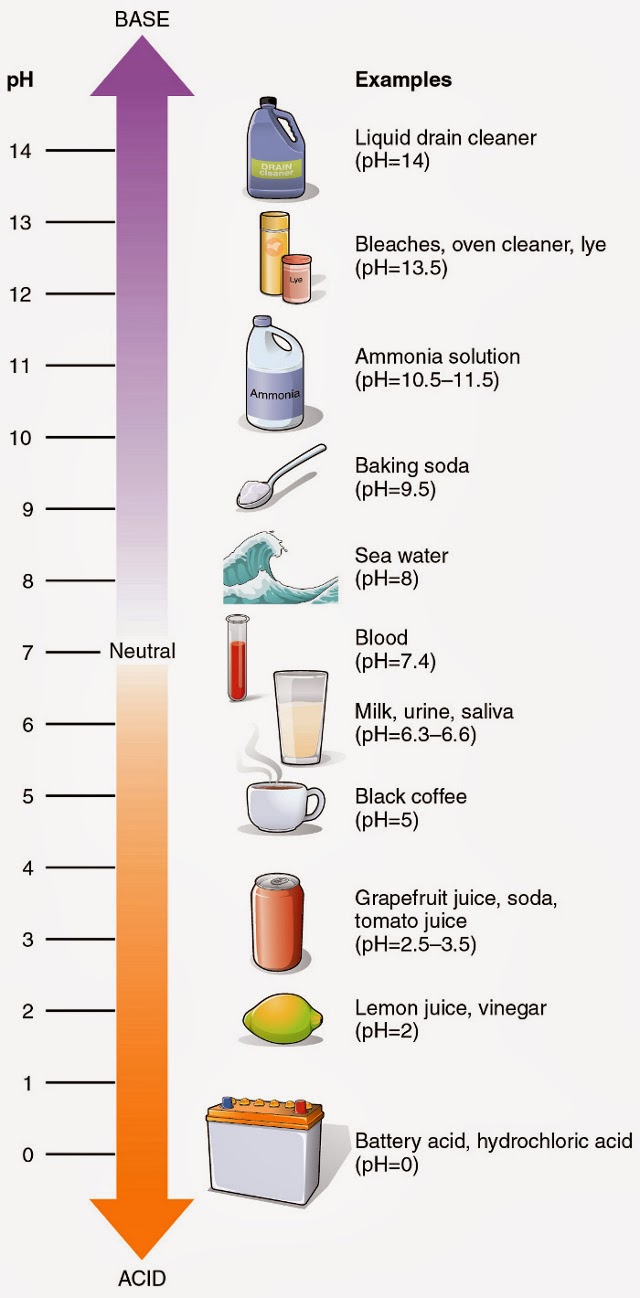
Source: Anatomy & Physiology, Connexions Web site via Wikipedia


Hair and skin are covered by a very thin fluid layer comprised of oil, salt and water, called the mantle, which is slightly acidic and has a pH balance of between 4.5 - 5.0.
The natural acidity of the hair and scalp prevents fungi and bacteria, and keeps the cuticle closed and healthy.
An inadequate hair product can disrupt the natural pH of the hair. If your haircare routine is too alkali your hair cuticles will stay open and your hair will be dry and brittle. But if you use pH balanced products, i.e. ones that are close to the natural pH of the hair (4.5 - 5.0) your hair cuticles will close properly which will result in healthy shiny hair.

The no-poo case of baking soda and vinegar

Hair has a pH of 4.5 to 5.0 - it is slightly acidic.

Baking soda has a pH of 9.5, which is extremely alkali.

Apple cider vinegar has a pH of 3.0 - 4.0 if diluted, a bit more acidic than hair.

For a healthy and nourished hair, you need to use hair products with balanced pH, i.e. close to the pH of your hair, so we're looking into hair products with a pH of 4.5 to 5.0.

What happens when you wash your hair with baking soda? 

You dilute a tablespoon of baking soda (pH 9.5) in a cup of water (pH 7).

Now, here is the shock to all baking-soda advocates (me included). This is also a shout-out to those who claim that the key to proper no-pooing with baking soda is in the amount of water and we should dilute, dilute, dilute.

To make things easier to grasp, here are the photos I took while experimenting with my litmus papers.

pH of baking soda diluted in water for no-poo hair washing

Let me explain:

1 tbsp. baking soda diluted in 1 cup of water (300 ml = 0.60 pt) has a pH of 9.5. This is extremely high to use on hair and scalp, having in mind that their natural pH ranges between pH 4.5 and 5.0 - 5.5.

Based on all I've been reading by people who wash their hair with baking soda in the past 3 years, if  I dilute 1 tbsp. in 2 cups of water, the pH should go down. BUT IT DOESN'T. The pH remains 9.5 until I dilute 1 tbsp. baking soda in 10 cups of water and then again, it is way to alkali to use on the hair.

Again, there is no difference between 10 and 20 cups of water, the pH of the mixture is 9.0

Only when I dilute 1 tsp. of the mixture (consisting of 1 tbsp. baking soda and 20 cups of water) in 1 cup of water, the pH gets down to pH 7.0 -- again, extremely alkali for use on hair, even if it is followed by ACV rinse.

I am devastated by the results.  But most of all I am disappointed by myself for believing people who knew close to nothing regarding the chemical side of this "experiment".

You can clearly see that the color of the litmus papers practically doesn't change regardless of the dilution. Even diluted in 20 cups of water, a tablespoon of baking soda is too alkali to be a healthy cleaning agent for hair. To get a neutral mixture of baking soda and water (pH 7) you need to dilute 1 tbsp. baking soda in 20 cups of water, then take 1 tsp. of the mixture and dilute it in 1 cup of water.

By washing my hair with baking soda twice a week for the past 3 years I have pretty much put it through the chemical process of dyeing. Twice a week.

Here is how the process goes:

The extremely alkali baking soda opens up the hair cuticle, if it is not closed by using an acidic substance, the hair will look frizzy, dry, and brittle and will be prone to breakage and tangling. That is why, we, baking soda aficionados use something acidic, like apple cider vinegar, which neutralizes the effect of the alkali baking soda and closes the hair cuticle.

And we think that is enough. We open and then we close.

BUT as one reader of Thank Your Body put it quite correctly

Forcing your hair to go up to pH 9.5 (with baking soda) and then forcing it back down to pH 4.5 - 5.0 (with ACV) in a short period of time makes it extremely vulnerable.

This is a very damaging process which is not healthy for the hair and scalp.

Extremely alkaline solutions like baking soda cause the disulfide bonds between keratin protein molecules to break down and can eventually dissolve the protein completely resulting in a very damaged hair. Highly alkaline solutions such as baking soda make your hair soft and manageable BUT that is really the disulfide bonds in your internal hair structure being weakened by the alkaline solution.

But we've all heard that baking soda helps regulate pH, why should it be considered damaging?

According to Future Derm:
Yes, it is true that baking soda helps regulate pH — keeping a substance neither too acidic nor too alkaline. When baking soda comes in contact with either an acidic or an alkaline substance, its effect is to neutralize that pH. However, as any cosmetic chemist can tell you, this effect occurs when baking soda is in solution with other chemicals. When baking soda is in water alone, guess what the pH of the solution is? You guessed it: A very basic 9, much more alkaline than plain ol' water.

pH balanced treatment = healthy hair

What you need to do if you want healthy and strong hair is to use hair products with balanced pH close to the natural pH of our hair and scalp, i.e. pH 4.5 - 5.0.

Putting your hair through roller-coaster extremes like those of baking soda and vinegar is more damaging than you realize. Until it is too late.

Don't wait for years like me. Because now my hair is in deep trouble.
Baking soda, which I used twice a week for almost 3 years is too abrasive and alkali and although it made my hair look soft and clean, it stripped my hair cuticles of the necessary oils and made it thin and brittle.

Now what?

I am starting a quest to find the best no-poo alternatives to baking soda. I want my healthy hair back without the help of chemicals disguised as shampoos. I will continue using apple cider vinegar as a rinse to keep my hair cuticles closed and healthy but, armed with my litmus papers I am off experimenting with natural shampoos and keeping you updated on what I find.

If you want me to test a natural shampoo recipe you know, post the link to it in the comments.

Update: Here is a growing collection of links to the results of testing some baking soda alternatives (bookmark this page or follow me on Google Plus to be updated when new recipes are tested out):

Homemade rye flour shampoo (works much better than baking soda)!
Coconut milk + aloe vera shampoo (for dry hair)

My post triggered a very interesting discussion on reddit (find it here) and one user shared her chemical calculations confirming my findings, regarding the pH of 1 tbsp baking soda diluted in 1 cup of water. Even if you're not a chemistry genius, you might want to take a look and read her conclusions here

Resources:
http://www.curlynikki.com/2013/09/ph-and-natural-hair-what-you-need-to.html
http://empoweredsustenance.com/no-poo-method-damages-hair/
http://www.hairfinder.com/hair/hair-ph-level.htm
http://en.wikipedia.org/wiki/PH
http://www.futurederm.com/2012/06/20/3-reasons-why-baking-soda-and-apple-cider-vinegar-destroy-your-hair-and-what-to-use-instead/
http://www.wikihow.com/Balance-pH-in-Hair-Naturally
http://www.thankyourbody.com/all-natural-shampoo/

This post is shared here: Motivation Monday


20 January 2014

Heal Acne and Pimples With Potatoes

By now you all know about the banana peel method I use for treating acne. If you ask me, it is the most efficient anti-acne treatment ever. But since so many people allergic to bananas emailed me with concerns about their allergy I set to find another natural, equally effective way to fight acne, pimples and the scars they leave.

How can potatoes possibly heal acne?

What makes bananas so efficient in drying the skin, healing the spot and cleaning the blemishes is the potassium, sulphur and chlorine they contain.

It turns out that potatoes have 1,5 times more potassium than bananas! They should be able to clean acne, shouldn't they?!


The vitamins and minerals in potatoes help improve your skin, and the acids will clear up your pores. The magnesium will help reduce inflammation and swelling.

How to Heal Acne With Potatoes
Photo: lusi on rgbstock

Here is what you need to do to heal your acne with the help of potatoes

  1. Wash a medium sized potato. 
  2. Cut a thin slice.
  3. Wash your face. Rub the raw potato slice gently over the irritated area. Rub for about 1-2 minutes or until the potato slice dries out. The potato will gently exfoliate the surface of the skin.
  4. Cut a new slice for the next area you want to treat.

To speed up the results, after rubbing you might want to grate some potato and squeeze the juice. Then cover the acne spots with it and leave it to dry. It will look like this:

How to Heal Acne With Potatoes

Repeat the whole process at least 3 times a day. See the results I got in just 5 days here.

Tip: A diet rich in potatoes will help you heal your acne from the inside.

17 January 2014

Homemade Lemon Lip Balm Tutorial (Based on Burt's Bees)

I've been having some trouble finding a healthy lip balm on the market. Usually, when I find one, I am put off by the price. And so, when a month ago I finished my all-natural store-bought, Weleda lip balm I thought it was time to finally make my own!

I searched Pinterest and Google for the recipe that will be best for dry and cracked winter lips and after much reading and research I adapted one recipe, added some personal preferences and here it is, my homemade lemon lip balm based on the Burt's Bees version on Happy Money Saver.

How to make lemon lip balm at home

Ok, so this is a really small batch, the ingredients were enough for six 0.15 oz (5 ml) lip balm tubes, which suits me perfectly. I will even have a few for gifting. But if you want to make more you can increase the ingredients proportionally.

How to make lemon lip balm at home


INGREDIENTS:
(for about six 0.15 oz/5 ml lip balm tubes)
  • 10 g beeswax
  • 10 g cocoa butter
  • 20 g sunflower oil
  • 4 drops vitamin E
  • 3 drops almond oil
  • 4 drops lemon essential oil
  • 3 drops peppermint essential oil

DIRECTIONS:
I used my electronic kitchen scale to measure the ingredients exactly.

1. Since I don't like using a microwave and I don't own one, I simply used a double boiler method and placed a smaller pan above a larger one, filled halfway with water. The first step is to turn the heat.

2. Measure the beeswax and add to the pan. It takes the longest to melt, and so it is better to put it first. You can use any type of beeswax. Mine was a solid block from which I grated 10 g.

3. Measure the cocoa butter and add to the beeswax.

How to make lemon lip balm at home

4. Measure the sunflower oil in a cup.

5. Pour 4 drops of vitamin E to the sunflower oil or if you, like me, have vitamin E tablets, dampen one and squeeze. It wil split open and you will easily squeeze 4 drops.

How to make lemon lip balm at home

6. Add the sunflower oil + vitamin E to the pan, where by now everything should be almost melted.

7. Once there are no solid parts and everything is melted, add the essential oils and mix well.

I used the back of the mixing spoon to put some cooled balm on my lips and test if I liked the taste and scent. I added a drop of lemon.

8. With a dropper and while your pan is still on the stove (to keep the mixture from hardening too quickly) add the liquid balm to the tubes. The mixture will settle slightly as it cools, so you could re-top the containers after about 2 minutes as they start to harden.

How to make lemon lip balm at home


9. Wait for several hours until your homemade lemon lip balm has completely hardened and is ready to use!

How to make lemon lip balm at home


10. Store in a cool dry place (they will last for at least a year if stored correctly).


What heals what:

BEESWAX
Beeswax creates a seal on your lips that protects them from air and other elements that can dry them out but still allows the skin to breathe.

COCOA BUTTER
Cocoa butter is rich in antioxidants and helps keep the skin young and fresh. It also is high in fatty acids which hydrate the skin deeply.

SUNFLOWER OIL
Sunflower oil contains high amounts of Beta-carotene, vitamin E, A, C and D, it gently moisturizes and protects the skin from infections. It also protects from sunburn.

VITAMIN E
Vitamin E is one of the most powerful antioxidants that protects and repairs the skin. It lubricates the skin and can be used for treating sunburn and protecting from the sun. It also helps the healing process of chapped lips.

How to make lemon lip balm at home

You can feel the delicate scent of lemon and the refreshing tingle of peppermint as a wonderful addition to the rich creamy taste of cocoa butter. This lip balm is so easy to make and so tasty! Why did I wait for so long before making my first batch?


15 January 2014

Marshmallow Root: Herbal Remedy for Treatment of Sore Throat and Cough

I haven't used medicines for sore throat for years. I make sure to take my Omega-3 in the wintertime, and to eat fresh vegetables and fruits as often as possible, I also drink immune boosting drinks to prevent colds and flu.

But whatever I do sometimes sore throat happens and to stop the development of a cough I use Marshmallow root (Althaea officinalis).

Actually, it has been used to treat sore throat and cough since antiquity.

Marshmallow Root for Treatment of Sore Throat and Cough
This image is in the public domain.
Marshmallow can soothe an inflamed sore throat. It also has immune stimulating properties and it is even used to moisten the lungs in cases of dry hot conditions, such as hot coughs with little to no expectoration. According to Learning Herbs, recent scientific research has shown it to be a powerful anti-tussive herb as well.  

The best way to enjoy the medicinal qualities of Marshmallow root is by preparing tea. But wait, this tea will be a bit more special.

When we think of tea, we envision a warm, aromatic cup. Not with Marshmallow root. It is best prepared with cold water.

The root of Marshmallow is rich in mucilaginous polysaccharides and starches which can be best extracted with a cold infusion.

Here is how to prepare Marshmallow root tea to treat sore throat.

1. Boil 2 pt (1 l) water. Let cool until lukewarm.

2. Place 1,5 tablespoon dry marshmallow root in a glass bowl. Add the lukewarm water.

3. Let stay for 2 hours. Strain. The resulting liquid should be thick and viscous.

4. Divide in three equal parts and drink three times during the day. You may add a teaspoon of honey if you prefer a sweeter taste.

You will feel relief before the day is gone.

DISCLAIMER: Please note that this information is only meant as a guideline and in no way replaces the advice or treatment provided by your medical practitioner. It is always good to seek the advice of your physician, homeopath, naturopath, or herbalist for professional advice in any matter related to your health. This article is for information purposes only.

13 January 2014

What Would Help You Live Healthier and Simpler In 2014?

Did I have the chance to wish you a Happy New Year? Thank you for following the Kanelstrand blog in the past year. I wish each of you a lot of inspiration and happiness in 2014!

As you have probably heard, I didn't make New Year's resolutions. Instead, I decided to focus on being mindfully present and not to procrastinate in 2014.

That is why, the Kanelstrand blog is branching out! Where, when and how will remain a secret for now  but while I am working on the expansion, I am also thinking about you. I want to make the Kanelstrand blog even better for you this year but you have to help me with it.

What would help you live a better life in 2014?

Reply in the comments and let me know what would help you live a healthier, simpler life in 2014.

Here are some topics for you to consider:
  • Simple and mindful living
  • Homemade bath and beauty products
  • Herbal remedies
  • DIY cleaning
  • Healthy cooking from scratch
  • Something else
Think about it well and be honest, let me know how I can help you achieve the life you want.

It became a tradition for me to make a survey each year and learn from you which aspects of simple and healthy living you need help with. I am very interested in what issues you are facing in your daily attempts to live a better, slower and more mindful life.

The thoughts you share will hopefully form a plan for solving a lot of issues and Kanelstrand will continue to be a place where we grow together and learn from each other.

I am going to choose the most helpful comment and send you a little surprise for leaving your thoughts, so when commenting make sure I have a way to contact you.

Thank you!

09 January 2014

10 Ways to Wash Your Hair Without Shampoo

I have been washing my hair without shampoo for the past 3 years. Once I tried baking soda I never looked back to shampoo. Unlike many people I didn't have any problems adjusting and from day one of baking soda my hair looked healthy and clean.

If you are wondering why I stopped buying shampoo, you can read more about the toxic chemicals in it and decide for yourself.


10 recipes for homemade shampoo

My routine with baking soda is as follows:

I dissolve 1 tablespoon of baking soda in 1 cup of lukewarm water and then, in the shower I pour carefully the mixture with one hand while I massage the hair and scalp with the other. I try to cover my whole head and make sure I have all my hair curled up in a loose bun on my head, so it can soak too. After I've poured the whole cup I massage once again both the scalp and the hair and rinse.

Edit: Since I wrote this post I have learned the hard way that baking soda is extremely detrimental to hair. You can read a very thorough article with my findings, called Baking Soda Destroyed My Hair and see for yourself. I do not recommend anyone to ever wash their hair with baking soda.

To finish the procedure, in another cup I have 2 tablespoons of apple cider vinegar mixed with water. I use this mixture as a conditioner. My hair is soft and shiny afterwards.

To avoid the smell of the vinegar, I put a pinch of dry rosemary. Actually I have a whole bottle of vinegar with rosemary, which I use for my hair.

I also stopped blow-drying my hair and I am quite happy with the acquired elasticity and vitality of my hair.

If you have tried using baking soda as a no-poo method and it resulted in dry hair, you might have added too much baking soda. 1 tablespoon to 1 cup of water is just enough for my hair, which is currently about 20 inches long.

But even if you've been diligently keeping the ratio and you are still not getting the desired healthy hair, here are a few other natural ways to wash and nourish your hair.

You will find the full recipes and which hair types they're for beneath the graphic.


10 ways to wash your hair without shampoo


Egg yolk and baking soda shampoo for all hair types
  • 1 egg yolk
  • 1 teaspoon baking soda
Beat the yolk with a fork and add the baking soda. If your hair is longer you may want to add another yolk to the mixture. Massage it gently to your scalp and hair. Cover your head with a a shower cap and a towel and wait for 2 hours. Rinse with lukewarm water.

Egg yolk and castor oil dry hair shampoo
  • 1 egg yolk
  • 2,5 tablespoons castor oil
Mix the ingredients and spread on wet hair. Massage gently and rinse with lukewarm water.

Egg yolk, olive oil and lemon dry hair shampoo
  • 2 egg yolks
  • 10 drops olive oil
  • 10 drops lemon juice
  • 5 drops glycerin
Mix all the ingredients and use as a regular shampoo. Rinse with lukewarm water.

Yogurt shampoo for dry hair
  • 5 oz. (150 gr.) natural yogurt
Whip the yogurt until no lumps are left. Spread it evenly on your hair. Cover your head with a a shower cap and a towel for 30 minutes. Rinse with lukewarm water.

Yogurt and baking soda dry hair shampoo
  • 7 oz. (200 gr.) natural yogurt
  • 1 tablespoon baking soda
Add the baking soda to the yogurt and mix well. Spread the mixture evenly on your head. Let it work for 15 minutes. Rinse with lukewarm water.

Yogurt and egg yolk oily hair shampoo
  • 7 oz. (200 gr.) natural yogurt
  • 1 egg yolk
Beat the egg yolk and add to the yogurt. Mix well. Spread on your hair evenly and massage gently. Rinse after 15 minutes with lukewarm water.

Soapwort shampoo for oily hair
  • 7 oz. (200 gr.) dry soapwort (Saponaria officinalis)
Cover the herbs with 4 pt. (2 l.) boiling water and let simmer for 30 minutes. Strain and wash your hair with the resulting infusion then rinse with clear water.

Soapwort has the ability to dissolve fats or grease and that is why it is one of the best herbs to use for oily hair.

Tip: For increased effect, collect the infusion in a bowl and pour on your head once again before rinsing with lukewarm water.

Kaolin shampoo for regulating the oil secretion
  • 3 - 4 tablespoons kaolin
Mix the kaolin with warm water until it forms a paste without lumps. Spread evenly on your head and wet hair. Rinse.
Kaolin is known to regulate the oil secretion and is equally good for dry and oily hair.

Kaolin and vinegar shampoo for dry and damaged hair
  • 2 tablespoons of apple cider vinegar
  • 3 - 4 tablespoons of kaolin
In a clean porcelain bowl mix the ingredients. Spread the resulting mixture on wet hair and massage well into the scalp. Let it stay for 1 hour. Rinse with lukewarm water.

Using natural ingredients to wash your hair instead of shampoo requires patience and spare time. Make sure you have both before you start.

Here are even more ways to rejuvenate and nourish your hair:

5 Natural alternatives to toxic shampoo
7 Green ways to deal with static hair
The best treatment for dry hair
8 DIY hair treatments for dry, brittle and damaged hair
5 Natural alternatives to toxic shampoo
What everybody should know about shampoo
4 Natural remedies against dandruff
Herbal nourishing hair lotion

This post was shared here:
Frugally Sustainable


06 January 2014

Simple Living Rabbit: In the Garden

In the winter months, although we still don't have snow around here, it's kind of cold and Muffin Rabbit doesn't go outside.

But since his summer was so active, I can still show you what he was up to a few months ago.

Every day Muffin Rabbit took a stroll along the vegetable beds. Being a town rabbit originally he was used to taking the paths and he never walked through the produce.

Here he is monitoring the growth of the cabbage.


Read more about the adventures of Muffin, the simple living rabbit.